TECHRENA

Welcome to the Technical Arena providing the latest updates and solutions!!

  • Entries
  • Comments

  • HOME
  • |
  • How To
  • |
  • Solutions
  • |
  • Windows 7
  • |
  • Techrena dot Net

Showing posts with label Windows7. Show all posts

Create and Run Windows XP Virtual PC in Windows 7

Labels: Solutions, Virtual XP, Windows, Windows7

For those who love Windows XP and if you still want to use Windows XP even after migrating to Windows 7, you have an option of installing a Virtual PC running Windows XP. This does not require any Virtualization Hardware or Microsoft’s Virtual PC. What you need is VMware Player 3.

WindowsXpinstallationprocess[1]

You do not need to download any Virtual XP mode from Microsoft for doing this. You just need your Windows XP CD or the iso backup file You can create a Virtual PC of your own. For more details Visit techrena.net:

Click Here: Install and Run Windows XP in Windows 7 Using VMware Player

Posted by Dennis on Sunday, March 07, 2010
3 comments

Download and Install Acer Crystal Eye Web Cam Driver for Windows 7

Labels: Acer Aspire, Drivers, How To, Notebooks, Windows7

Acer Laptop users are facing problem with the Webcam Driver while migrating to Windows 7. While other devices work with the Windows 7 inbuilt drivers, the Acer Crystal Eye Web cam device needs an explicit Driver.

Most of the available drivers give the error:

No Acer video capture device was detected on your system

Here we have given the correct driver for Windows 7 which works perfectly fine With Acer laptops.

Acer Cam Crystal eye Win7


The driver can be downloaded and installed from the link below:

Download Acer Cystal Eye Web Camera Driver for Windows 7

Posted by Dennis on Sunday, February 28, 2010
34 comments

How to Install Windows 7 Using Bootable USB Disk Drive

Labels: How To, USB BOOT, Windows7

With the release of the full version of Windows 7 many people have decided to go for Windows 7 over Vista. If you want to upgrade to Windows 7 from Vista, you just need the the iso fle or the backup and use a USB flash drive to install Windows 7.

Install Windows 7 or Vista Using Bootable USB Disk Drive

Well the method is given in the link below. which is one of the easiest techniques known which does not need any kind of download, clear step by step and screen shots have also been given.

http://www.techrena.net/windows/install-windows-7-vista-usb-boot-drive/

Posted by Dennis on Thursday, February 18, 2010
2 comments

More GodMode Like Secret Windows 7 & Vista GUID Shortcuts

Labels: GodMode, Windows, Windows7

Last week we have seen how to enter secret  ‘GodMode’ in Windows 7 and Windows Vista.

To setup God Mode, create a new folder and rename it as GodMode.{ED7BA470-8E54-465E-825C-99712043E01C}

There are plenty more GUID ('Globally Unique Identifier') tricks available, Techrena DOt Net blog post deals with them

Check below link:

More “God Mode” Like Windows 7 GUID Shortcuts


1.Just For Windows 7 Only (And Later Versions):

Shortcut

GUID code

1.Action Center

{BB64F8A7-BEE7-4E1A-AB8D-7D8273F7FDB6}

2.Backup and Restore

{B98A2BEA-7D42-4558-8BD1-832F41BAC6FD}

3.Biometric Devices

{0142e4d0-fb7a-11dc-ba4a-000ffe7ab428}

4.Credential Manager

{1206F5F1-0569-412C-8FEC-3204630DFB70}

5.Default Location

{00C6D95F-329C-409a-81D7-C46C66EA7F33}

6.Devices and Printers

{A8A91A66-3A7D-4424-8D24-04E180695C7A}

7.Display

{C555438B-3C23-4769-A71F-B6D3D9B6053A}

More…… More…

Renaming for Networks connection shortcut

Networks connection shortcut

For more secret shortcuts in Windows 7 and Vista, visit

More “God Mode” Like Windows 7 GUID Shortcuts


Enter your email address:

Delivered by FeedBurner

Posted by techrena on Sunday, January 10, 2010
2 comments

How to remove Send Feedback Link From Windows 7 Explorer

Labels: How To, Solutions, Windows7
In Windows 7 Beta a Send Feedback Link is embedded in every Window [Refer the above pic]. Some users may find it annoying because you may click it unknowingly, if you are one of those then this post will help you to remove Send Feedback Link from your Windows.

Just follow the steps below to get rid of the Send Feedback link:

Step 1: Press Start+R, type regedit and Enter.

Step 2: In the left pane of the Registry Editor navigate to:
HKEY_Current_User\Control Panel\Desktop as shown in the image below.

Step 3: Locate the registry key "FeedbackToolEnabled" on the right side of the Registry Editor.

Step 4: Double Click on "FeedBackToolEnabled" key and Change the value from 3 to 0. Press OK


Step 5: After completing the change, reboot your system, and your system should have no feedback link like the image below:

Windows 7 no-feedback
N.B.:
Windows 7 is still a beta software, so you should not stop sending feedback to Microsoft. So if you want to send any feedback go to control panel and use the send feedback option.
Posted by Dennis on Thursday, February 12, 2009
0 comments

Delete or Remove mfpmp.exe from a Windows 7 or Windows Vista Computer

Labels: How To, VistaSolutions, Windows7
In Windows 7 or Vista the Windows Media Player has a system file named mfpmp.exe. The file is Present in C:\Windows\System32. But sometimes this file creates a lot of problem like taking lot of resources, not playing the subtitles etc. So most of us consider to delete it. But we need to take ownership of the file in order to get rid of mfpmp.exe. Otherwise it shows the error message below.
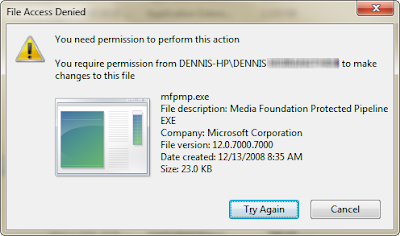

Just follow these simple steps and you will get rid of mfpmp.exe in no time.

Step 1: Open command prompt (Press Start+R, Type cmd and Enter).
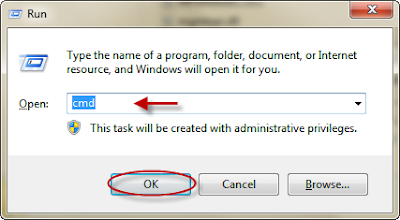
Step 2: In command prompt, type:
takeown /f C:\Windows\System32\mfpmp.exe
and press Enter
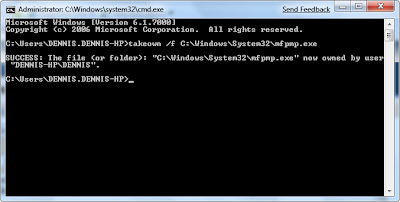
Step 3: Again in command prompt, type:
icacls C:\Windows\System32\mfpmp.exe /grant (user name):F
and press Enter.
For example, icacls C:\Windows\System32\mfpmp.exe /grant DENNIS:F
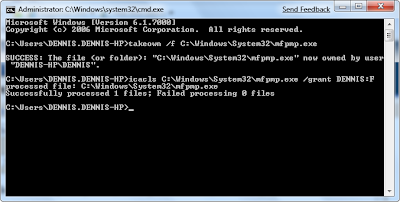
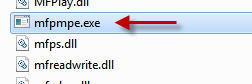
Step 4: You should be able to delete the file mfpmp.exe now. If you still can't, you may need to reboot and try again. Try Renaming the file to anything else then mfpmp.exe as shown below if you dont want to delete it.
N.B.:
1. You Can delete the mfpmp.exe file. But i renamed it if in case you need it in future.
2. This technique for taking ownership can be used for any file.
Posted by Dennis on Thursday, February 12, 2009
12 comments

How to take Ownership of a file in Windows Vista Or Windows 7

Labels: How To, VistaSolutions, Windows7
In Windows 7 Or Vista when we try to edit or delete a system file it may show an error message as shown below. Sometimes we need to remove a system file which we consider it useless, for example mfpmp.exe etc. we need to take ownership of the file in order to rename it or delete it.


Follow these simple steps to take ownership of the file.

Step 1: Open command prompt (Press Start+R, Type cmd and Enter).

Step 2: In command prompt, type: takeown /f (Full path of the file and file name) and press Enter
Example: takeown /f C:\Windows\System32\mfpmp.exe

Step 3: Again in command prompt, type:
icacls (Full path of the file and file name) /grant (user name):F and press Enter
For example, icacls C:\Windows\System32\mfpmp.exe /grant DENNIS:F

Now You Can delete or rename the file. If you still can't, you may need to reboot and try again. This is one technique for taking ownership for any file.

Posted by Dennis on Thursday, February 12, 2009
0 comments

Enable Subtitles in Windows 7 Media Player 12

Labels: How To, Solutions, Windows7
In Windows 7, the windows media player 12 is not playing subtitles like srt, sub etc. even if we install Direct VobSub. In order to enable the subtitle feature in media player we need to rename a system file called mfpmp.exe. The file is Present in C:\Windows\System32. But we need to take ownership of the file in order to rename it. Otherwise it shows the error message below.


Just follow these simple steps and you will get subtitles in your media player.

Step 1: Open command prompt (Press Start+R, Type cmd and Enter).

Step 2: In command prompt, type:
takeown /f C:\Windows\System32\mfpmp.exe
and press Enter
Step 3: Again in command prompt, type:
icacls C:\Windows\System32\mfpmp.exe /grant (user name):F
and press Enter. For example, icacls C:\Windows\System32\mfpmp.exe /grant DENNIS:F

Step 4: You should be able to delete or modify the file now. If you still can't, you may need to reboot and try again. Try Renaming the file to anything else then mfpmp.exe as shown below.

N.B.:
1. You should have Direct VobSub to get subtitles. You should install Codecs like K-Lite Codec which includes VobSub.
2. You Can delete the mfpmp.exe file. But i renamed it if in case you need it in future.
3. This technique for taking ownership can be used for any file.

Posted by Dennis on Wednesday, February 11, 2009
36 comments

Windows 7 Sidebar Not Working ? Enable it in easy steps

Labels: How To, Solutions, Windows7
Windows 7 sidebar with gadget stops working if User Account Control (UAC) is disabled as shown below. Microsoft may have done this to prevent users from installing any malicious unsigned desktop gadget in windows 7. But most of us prefer to keep User Account control (UAC) disabled, that means we wont be able to enjoy desktop gadgets and sidebar in Windows 7.


Microsoft may have done this to prevent users from installing any malicious unsigned desktop gadget in windows 7. But most of us prefer to keep User Account control (UAC) disabled, that means we wont be able to enjoy desktop gadgets and sidebar in Windows 7.

But here I have given a solution to make Windows7 sidebar with gadget to work when UAC is disabled or turned off.

Follow the Simple Steps below:

Step 1: Press Start+R, type regedit and Enter.

Step 2: In the Registry Editor follow the registry key path in left side. This is also shown in the images below.

HKEY_LOCAL_MACHINE\SOFTWARE\Microsoft\Windows\CurrentVersion\Sidebar\Settings

Step 3: Right Click in right side of Registry editor. Create A New DWORD(32 Bit Value) with name “AllowElevatedProcess” and set value as “1”.


Step 4: Close registry editor. Then Right click on desktop and add desktop gadgets.

Now Your Desktop Gadgets and sidebar will be working perfectly fine.
Posted by Dennis on Wednesday, February 11, 2009
19 comments
Older Posts Home
Subscribe to: Posts (Atom)


  • Techrena Dot Net

Loading...

Enter your email address:

Delivered by FeedBurner

  • Blog Archive

    • ▼  2010 (14)
      • ▼  October (1)
        • WinX HD Video Converter Deluxe With Free License Code
      • ►  August (1)
      • ►  July (1)
      • ►  April (1)
      • ►  March (2)
      • ►  February (3)
      • ►  January (5)
    • ►  2009 (35)
      • ►  November (2)
      • ►  April (3)
      • ►  March (10)
      • ►  February (12)
      • ►  January (8)
    • ►  2008 (20)
      • ►  December (4)
      • ►  November (12)
      • ►  October (4)

    Labels

    • Acer Aspire (1)
    • Adsense (2)
    • apple (1)
    • Bing (1)
    • Blogger Tips (1)
    • Browers (2)
    • Canon (1)
    • Chrome (1)
    • Deep Linking (1)
    • Digital Cameras (1)
    • Downloads (3)
    • Drivers (1)
    • Firefox (1)
    • Gmail (1)
    • GodMode (1)
    • Google (7)
    • Greasemonkey (1)
    • How To (29)
    • HP Laptops (3)
    • Internet (1)
    • iPod (1)
    • Mobile Phones (4)
    • Network (2)
    • Nokia (4)
    • Notebooks (4)
    • oscars 2010 live (1)
    • Password (2)
    • PDA (1)
    • Router (2)
    • Solutions (15)
    • Sony Ericsson (1)
    • System (3)
    • TechNews (6)
    • USB BOOT (3)
    • Virtual XP (1)
    • Virus (1)
    • VistaSolutions (3)
    • watch online (1)
    • Websites (1)
    • Windows (8)
    • Windows7 (9)
    • Yahoo (1)
    • YouTube (2)

Copyright 2009 Techrena dot Net