TECHRENA

Welcome to the Technical Arena providing the latest updates and solutions!!

  • Entries
  • Comments

  • HOME
  • |
  • How To
  • |
  • Solutions
  • |
  • Windows 7
  • |
  • Techrena dot Net

Showing posts with label Solutions. Show all posts

How To Install a New RAM in Your Laptop

Labels: How To, HP Laptops, Solutions, System

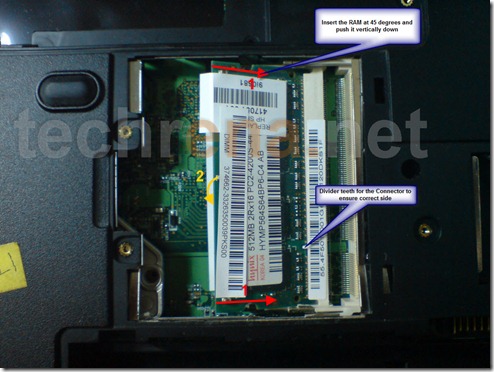
Software updates are very common. What About hardware Upgrades? We need to upgrade the hardware as well to get on par with the developing technology. We need to upgrade our PCs and laptops to fit and to support the currently available software and operating system.

Here I have given the complete tutorial on how to install a new RAM in your Laptop. Why to spend for such a small and easy thing by giving it to a service center. Why not do it yourself?

Install New RAM

Click The link Below to see the complete Tutorial:

How To Install or Upgrade Your Laptop’s RAM (Physical Memory) - Techrena dot Net

Posted by Dennis on Sunday, April 11, 2010
6 comments

Create and Run Windows XP Virtual PC in Windows 7

Labels: Solutions, Virtual XP, Windows, Windows7

For those who love Windows XP and if you still want to use Windows XP even after migrating to Windows 7, you have an option of installing a Virtual PC running Windows XP. This does not require any Virtualization Hardware or Microsoft’s Virtual PC. What you need is VMware Player 3.

WindowsXpinstallationprocess[1]

You do not need to download any Virtual XP mode from Microsoft for doing this. You just need your Windows XP CD or the iso backup file You can create a Virtual PC of your own. For more details Visit techrena.net:

Click Here: Install and Run Windows XP in Windows 7 Using VMware Player

Posted by Dennis on Sunday, March 07, 2010
3 comments

reCAPTCHA And Preventing Comment Spam In Websites

Labels: Solutions

Comment spam is really an issue that every webmaster/ blogger should be careful about.As this sort of spam can really affect your site either directly or indirectly.Comment spam annoys typical visitor/reader of your website.

The solution is using CAPTCHA technology.

recaptcha example screenshot

reCAPTCHA is one such free service offering CAPTCHA to websites.To learn more, visit

http://www.techrena.net/internet/using-recaptcha-comment-spamming/ (Using reCAPTCHA To Prevent Comment Spam In Your Website)

Posted by techrena on Wednesday, January 27, 2010
0 comments

How to Transfer Contacts from One Gmail to Another Gmail Account

Labels: Google, How To, Solutions

Mr Karanam, one of our privileged reader had asked a query in Ask Techrena section of our blog. His question was:


Dear Techrena,
I want to transfer my current gmail contacts to another gmail account. I don’t know how to do this. It is difficult to transfer all the contacts manually. If there is any method to transfer the contacts please help me with it.

Thanking you in Advance.

Karanam Sreekanth

We have found the solution and have posted in our blog.

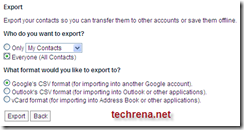
Exporting Gmail contacts to another Gmail account

It is an easy process. Gmail has made it very easy for users to transfer or export contacts from one Gmail account to another Gmail account. You have to just save the contacts as CSV format or vCard format and import the contacts using the other account.

The complete solution is given in the post below:

Exporting Gmail contacts to another Gmail account

We really appreciate our readers supporting us and posting queries. Please do support techrena and Help us providing you valuable solutions.

Posted by Dennis on Saturday, April 04, 2009
2 comments

How to Hide Inactive Icons in Windows Taskbar

Labels: How To, Solutions, Windows

Mr Ashok, one of our esteemed reader had posted a query in Ask Techrena section of our blog. His query was:


sir,
there is a problem in my laptop. is it does not hide the inactive icon. i can use the control panel and go to task bar option and apply the hide inactive icon but window does not hide the icon's. my laptop configuration is:
2GB ram
160 hard disk
processor core 2 duo
window XP

We have found the solution and posted in our blog.

Auto Hide Inactive Icons

The inactive icon tray may not show up sometimes in spite of enabling hiding from the taskbar properties. If such a problem occurs then we have to enable it from he windows registry. A registry named EnableAutoTray is to be created and set the value.

The complete solution has been described in the post below:

Enable Hide Inactive Icons Tray Using Registry in Windows

The solution works for Windows XP, Vista and Windows 7.

We sincerely thank Mr Ashok for asking for solutions and request all our blog readers to support techrena and not to hesitate to post their queries.

Posted by Dennis on Saturday, April 04, 2009
1 comments

Solve Turn off Button Missing in Welcome Screen in Windows XP, Vista and 7

Labels: How To, Solutions, Windows

A common problem for most of the Windows XP home edition users is that Turn off Button is missing from their welcome screen or their log on page. Most of us do not notice this problem as we do not care about it. But speaking the truth Turn off button is really necessary in the log on screen as we should be able to shut down the computer without knowing the password. Otherwise you will not be able to shutdown the computer safely without knowing the password. This problem of missing shutdown button from the welcome screen or the log on page may be a result of some registry change by some of the software you install. But this problem has a very simple solution. You just need to change a registry value.

Click here to see Missing turn off button from Wecome screen image

In Windows XP Home Edition or Vista Basic unlike the professional or ultimate editions which doesn’t support gpedit.msc or secpol.msc this problem can be solved by using only the registry.

I am presenting two methods here. Both the methods need your registry registry to be enabled. While performing the steps if you get an error message like Registry Editor has been disabled by your Administrator" then you have to enable the regedit command. To enable registry editor Click here.

Method 1: By using Command Prompt

Step 1: Open a command prompt (Press Start+R, Type cmd and Enter)

Step 2: Copy the command below and paste it in the command prompt. Note that for pasting in command prompt right click in the black screen and select paste.


REG ADD HKLM\Software\Microsoft\Windows\CurrentVersion\Policies\System /v ShutdownWithoutLogon /t REG_DWORD /d 1 /f

Click here to see Enable Turn off button in Welcome Screen using Command Prompt  image

Step 3: After executing the command Press Start+L and see if you can see the Turn off button. If yes ok, else restart.

Method 2: By using Registry Editor

Step 1: Open a command prompt (Press Start+R, Type regedit and Enter)

Step 2: In the Left side of the Registry Editor Navigate to the key given below:

HKEY_LOCAL_MACHINE\SOFTWARE\Microsoft\Windows\CurrentVersion\Policies\System

It is shown in the image below:

Click here to see Registry Editor path Shutdown without logon Image

Step 3: In the right side find the key ShutdownWithoutLogon. Double click on it and change the value to 1.

 http://img102.imageshack.us/img102/6976/shutdownwithoutlogon2.png

http://img214.imageshack.us/img214/3571/shutdownwithoutlogon1.png

http://img440.imageshack.us/img440/263/shutdownwithoutlogon.png

Note: If you are not able to find the key then you have to create it. Right click on the right side and select new DWORD 32 bit. Keep the Name as ShutdownWithoutLogon and set the value as 1.

Step 4: Now press Start+L and see if you can see the start button. If not Restart.

Click here to see Turn off button in Welcome Screen Image

Important:

1. If your turn off button goes missing again after some time then some process is changing the value. You need to repeat the steps again.

2. If you cannot find the root key System under Policies then create a key with the same name in the left side pane of the registry editor and continue.

Posted by Dennis on Monday, March 23, 2009
1 comments

Ophcrack USB Booting Windows Password Recovery for Windows XP or Vista

Labels: How To, Password, Solutions, USB BOOT, Windows

We have already seen using Ophcrack Live CD for Cracking Windows XP and Windows Vista Passwords. The thing is that now a days we do not use CDs anymore, we use USB drives for our day to day activities. Now what if you want to run Ophcrack from your USB drive instead of wasting money on a CD or if your CD ROM Drive is not working? Moreover using USB drives are more convenient and common these days. Here I have an Ideal solution for this question. But if you are not interested in recovering the password or you simply want to reset or delete the password then there is much easier technique which requires only a 3 MB file instead of Ophcrack. Just see how to Reset windows Password Using a USB drive or a CD

In this method we will be using a program called 7-ZIP for extracting the ISO file and some batch files for making the drives bootable.

USB Requirement:

  • Minimum 512 MB for Windows XP
  • Minimum 1 GB for Windows Vista Or Windows 7 Beta
  • Format: FAT32

I have tried this method in Windows XP, Windows Vista, and Windows 7 Beta and it works perfectly fine. Follow the steps below:

Step 1: Download the ISO File For Ophcrack Live CD 2.1.0 From the links below: (Choose according to your operating system). If you have already downloaded skip this step.

Windows XP:

Size: 452 MB

http://downloads.sourceforge.net/ophcrack/ophcrack-xp-livecd-2.1.0.iso

Windows Vista or 7:

Size: 532 MB

http://downloads.sourceforge.net/ophcrack/ophcrack-vista-livecd-2.1.0.iso

Step 2: Download the ZIP File For making USB boot version of Ophcrack Live CD From the link below:

Size: 414 KB

http://www.techrena.net/downloads/usbboot.zip

Step 3
: Extract the usbboot.zip file at any location of your computer, not in the USB drive.

Step 4: Copy the Ophcrack Live CD ISO file to the usbboot folder. Double Click the USBOphcrack.bat (ExtractophIso.bat) file.

Click here to View Ophcrack Usb boot image

Step 5: Type the letter of your USB drive and press Enter (The USB Drive should be Formatted with FAT32 File system before starting the process). Here in my case the Drive letter is ‘h’.

Click here to View Select Drive Image

Step 6: Wait for the Extraction process to complete. Follow the on Screen Instructions given by the command prompt as shown below.

Click Here to view Extraction Progress image

Click here to view makeusbboot.jpg

Click here to view usbbooting.jpg

Step 7: Now restart the System. You need to set the boot order to Boot from USB Drive as the first option if you have not set USB Drive as the first option. To do this you need to go to bios setup and change the order. For most of the systems the keys like DELETE, F10, F2, F12 etc are used for going to the Bios setup. But here I have used the Boot Menu Key which will show the available boot options during start up. For my System(HP) the boot menu key is Esc. For Compaq Systems it is usually F9. So if you know the Boot menu key then no need to change the order. Just Select USB Drive from the menu.

Click here to view bootmenu.png

Step 8: Now after the boot from USB Drive you can follow the Steps 4 to Step 7 given in the previous post:

Windows Password Recovery Crack Windows XP or Vista Password Using Ophcrack

Important:

1. If you are not interested in recovering the password or you simply want to reset the password then there is much easier technique which requires only a 3 MB file instead of Ophcrack. Just visit the link to see how it works:http://www.techrena.net/computers/reset-windows-xp-vista-7-password-usb-pen-drive-cd/

2. The windows vista live CD works for Windows 7 Beta Build 7000 also. There is no official release for Windows 7 yet.

3. This is for information purposes only. We are not responsible for any damages or illegal acts resulting from this information.

4. The information provided here should be used for legal purposes only.

5. Ophcrack is a legal open source program. Visit http://ophcrack.sourceforge.net/ for more details. Click Here to Read the Terms of Use.

6. The method given here may work for previous versions of Ophcrack Live CD also. Paste the ISO file in the OphcrackUSBboot folder and continue the process.

7. If your motherboard or your BIOS does not support USB diskette Booting then this method will not work.

Posted by Dennis on Friday, March 20, 2009
40 comments

Hide disk drives or partitions in Windows

Labels: How To, Solutions, System

A Tutorial on how to hide drives in my computer for windows systems

Hiding a folder or a file is a normal day to day process. But what do we do if you want to hide a drive or a partition. Sometimes we may want to hide a disk drive or a partition for our privacy. This question has been a problem with me till now. I have found out that it is a very easy process which needs to create a simple registry. We should note that the method i am going to give here does not delete any of your disk drives, data, and we can find the drives in the disk management. We can access the hidden drives from the address bar e.g. type D: in the address bar and enter to explorer D drive etc.

Drive: Value Drive: Value Drive: Value
A 1 B 2 C 8
D 16 E 32 F 64
G 128 H 256 I 512
J 1024 K 2048 Continue -------

Show All Drives: Value = 0

How It works:

A drive is assigned a value according to the drive letter. For example value for “A” drive is 2^0 (Two to the power zero) i.e. 1, “B” Drive is 2^1 i.e. 2 and it goes on.  Now if you want to hide D drive and E drive we have to give the value as (8+16) i.e. 24 in the command i have given below. Windows recognizes the values and hides your D and E drive. If you want to show all the drives give the value 0. Its simple.

Here I have given the simplest solution. Just follow the simple steps below:

Step 1: Press Start + R and type cmd. Click OK. It opens a command prompt.

Opening Command Prompt

Step 2: Copy the COMMAND code given in the table below:

REG ADD HKCU\Software\Microsoft\Windows\CurrentVersion\Policies\Explorer /v NoDrives /t REG_DWORD /d 24 /f


Step 3: Paste the code in the command prompt. In order to paste it, right click on the command prompt and select paste. Change the value according to the drives you want to hide and press enter. [Here the value i have given is “24” for hiding D and E drives(8+16), refer the table above for your values]

Paste in command Prompt

Step 4: The code will be executed as shown. Now Log Off your system and Log On (or simply restart).

Hide Disk Drives in windows

Note: 1. The value 24 is highlighted because this is the value you need to change according to your drives you need to hide.

Note: 2. If you get any error messages like “Registry editor has been disabled by your administrator” then you need to enable your registry editor. To enable your registry editor Visit the link given below:

http://techrena.blogspot.com/2008/11/how-to-enable-registry-editor-regedit.html

After restarting or logging on you will find that the selected drives are not present. In order to show all your hidden drives give the value as 0. If you find any problem ask us here.

Posted by Dennis on Thursday, March 12, 2009
1 comments

Install Windows XP from USB Disk Drive

Labels: How To, Solutions, USB BOOT, Windows

The post has been moved to the location http://www.techrena.net/computers/install-windows-xp-usb-disk-drive-pen-drive/ by the author. We regret for the inconvenience.

Go to Home Page: http://techrena.blogspot.com/

Posted by Dennis on Tuesday, February 24, 2009
1 comments

How to remove Send Feedback Link From Windows 7 Explorer

Labels: How To, Solutions, Windows7
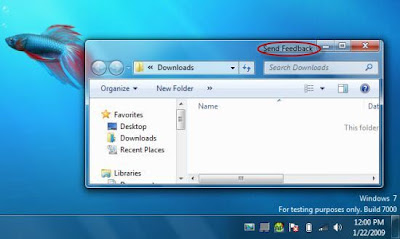
In Windows 7 Beta a Send Feedback Link is embedded in every Window [Refer the above pic]. Some users may find it annoying because you may click it unknowingly, if you are one of those then this post will help you to remove Send Feedback Link from your Windows.

Just follow the steps below to get rid of the Send Feedback link:

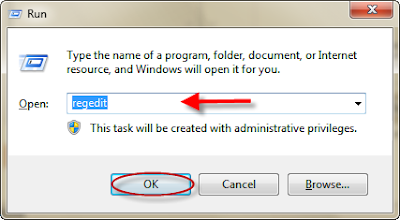
Step 1: Press Start+R, type regedit and Enter.

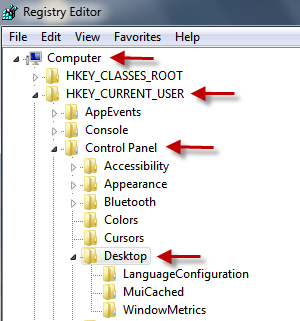
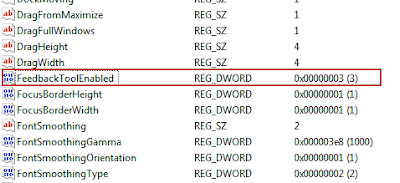
Step 2: In the left pane of the Registry Editor navigate to:
HKEY_Current_User\Control Panel\Desktop as shown in the image below.

Step 3: Locate the registry key "FeedbackToolEnabled" on the right side of the Registry Editor.

Step 4: Double Click on "FeedBackToolEnabled" key and Change the value from 3 to 0. Press OK


Step 5: After completing the change, reboot your system, and your system should have no feedback link like the image below:

Windows 7 no-feedback
N.B.:
Windows 7 is still a beta software, so you should not stop sending feedback to Microsoft. So if you want to send any feedback go to control panel and use the send feedback option.
Posted by Dennis on Thursday, February 12, 2009
0 comments

Enable Subtitles in Windows 7 Media Player 12

Labels: How To, Solutions, Windows7
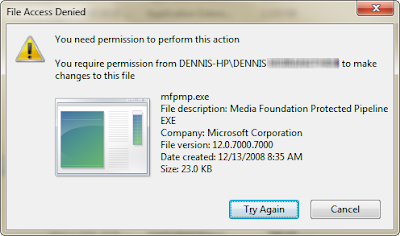
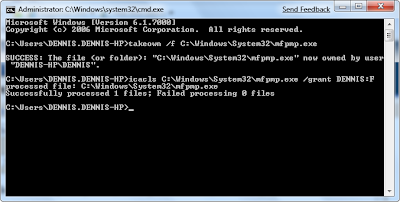
In Windows 7, the windows media player 12 is not playing subtitles like srt, sub etc. even if we install Direct VobSub. In order to enable the subtitle feature in media player we need to rename a system file called mfpmp.exe. The file is Present in C:\Windows\System32. But we need to take ownership of the file in order to rename it. Otherwise it shows the error message below.


Just follow these simple steps and you will get subtitles in your media player.

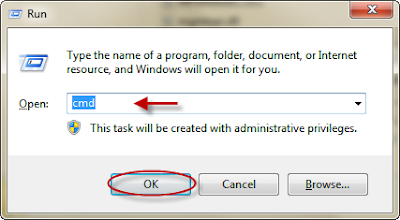
Step 1: Open command prompt (Press Start+R, Type cmd and Enter).

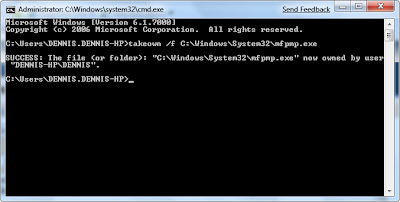
Step 2: In command prompt, type:
takeown /f C:\Windows\System32\mfpmp.exe
and press Enter
Step 3: Again in command prompt, type:
icacls C:\Windows\System32\mfpmp.exe /grant (user name):F
and press Enter. For example, icacls C:\Windows\System32\mfpmp.exe /grant DENNIS:F

Step 4: You should be able to delete or modify the file now. If you still can't, you may need to reboot and try again. Try Renaming the file to anything else then mfpmp.exe as shown below.

N.B.:
1. You should have Direct VobSub to get subtitles. You should install Codecs like K-Lite Codec which includes VobSub.
2. You Can delete the mfpmp.exe file. But i renamed it if in case you need it in future.
3. This technique for taking ownership can be used for any file.

Posted by Dennis on Wednesday, February 11, 2009
36 comments

Windows 7 Sidebar Not Working ? Enable it in easy steps

Labels: How To, Solutions, Windows7
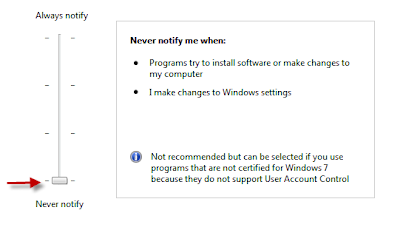
Windows 7 sidebar with gadget stops working if User Account Control (UAC) is disabled as shown below. Microsoft may have done this to prevent users from installing any malicious unsigned desktop gadget in windows 7. But most of us prefer to keep User Account control (UAC) disabled, that means we wont be able to enjoy desktop gadgets and sidebar in Windows 7.


Microsoft may have done this to prevent users from installing any malicious unsigned desktop gadget in windows 7. But most of us prefer to keep User Account control (UAC) disabled, that means we wont be able to enjoy desktop gadgets and sidebar in Windows 7.

But here I have given a solution to make Windows7 sidebar with gadget to work when UAC is disabled or turned off.

Follow the Simple Steps below:

Step 1: Press Start+R, type regedit and Enter.

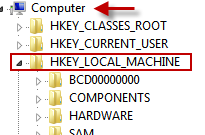
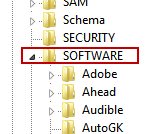
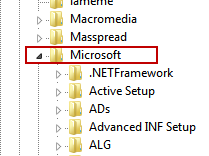
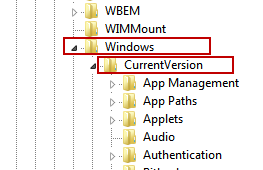
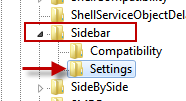
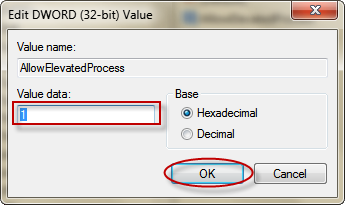
Step 2: In the Registry Editor follow the registry key path in left side. This is also shown in the images below.

HKEY_LOCAL_MACHINE\SOFTWARE\Microsoft\Windows\CurrentVersion\Sidebar\Settings

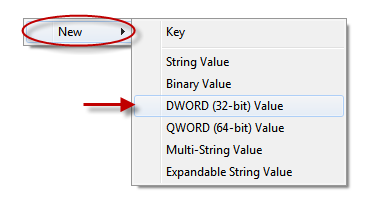
Step 3: Right Click in right side of Registry editor. Create A New DWORD(32 Bit Value) with name “AllowElevatedProcess” and set value as “1”.


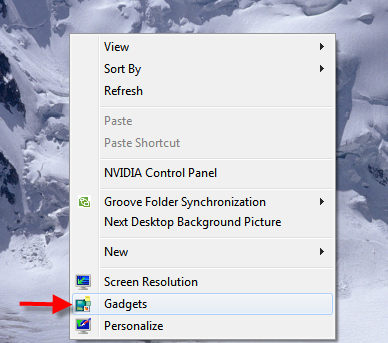
Step 4: Close registry editor. Then Right click on desktop and add desktop gadgets.

Now Your Desktop Gadgets and sidebar will be working perfectly fine.
Posted by Dennis on Wednesday, February 11, 2009
19 comments

How to remove Win 32 Sality gen Virus

Labels: How To, Solutions, Virus

If your computer gets infected with Win32/Sality.gen virus, its very easy to remove it. Follow the simple steps below:


Step 1: Download the .rar file from the link below.

Step 2: Extract it to a folder.

Step 3: Run the rmsality.exe file


It will automatically scan all the drives and remove the virus from your computer.

Download:

http://rapidshare.com/files/195947938/Win32SalityRemover.rar

Password: techrena

File Size: 460KB

N.B. :This application is a freeware of the AVG anti virus.
Posted by Dennis on Monday, February 09, 2009
10 comments

To Remove ‘Your Computer Might Be At Risk’ Message from your computer tray

Labels: How To, Solutions

Continuing our HOW TO series,we’ll look at how to remove ‘Your Computer Might Be At Risk’ alerts coming up in the tray icon on Windows XP based PCs.

If you disable/turn off the default ‘Windows Firewall’ or if you turn off Automatic Updates(Not Recommended) or if you don’t have any updated anti-virus program running on your Windows XP based computer,you would see some annoying message/alert coming at the tray icon of your PC.

Message would look like this:

“Your Computer Might be at risk”

Windows Firewall is Turned off

Automatic updates Disabled

Your Anti-Virus might be out of date.

Security Alert

It is actually intended to alert the user,however many PC users find it annoying.

So follow the below points to turn it off.

Navigate to Start>Settings>Control Panel>Security Center

Once you’ve launched the security center,look at the left hand side of the window.

Look for the ‘Change the way security center alerts me’ under ‘Resources’ tab.

Security Center

Click on it,it’ll open a new window[Alert Settings] which looks like the following:

Alert Settings

Uncheck all the options to completely turn off the security center alerts.That’s all,You’re done.

Note:However,it is Always highly recommended to turn on your firewall/automatic updates and update your anti-virus program.

Post comments if you liked this post.

Posted by Techie Blogger on Sunday, November 02, 2008
4 comments

How to Delete/Remove Surabaya virus/worm/Spyware from your Computer?

Labels: How To, Solutions

Many people are facing problem with the new USB worms coming up,one such worm is Surabaya Virus[As it calls itself by that name!]

Some info: Surabaya is the second largest city in Indonesia,the name and language suggests that the worm was actually originated in Indonesia by some spammer.Ok,enough about it’s history,Let’s get into the details of the worm’s operation.

When the virus enters your system,the following message would come up:

“Surabaya in my birthday
Don't kill me, i'm just send message from your computer
Terima kasih telah menemaniku walaupun hanya sesaat, tapi bagiku sangat berarti
Maafkan jika kebahagiaan yang kuminta adalah teman sepanjang hidupku
Seharusnya aku mengerti bahwa keberadaanku bukanlah disisimu, hanyalah lamunan dalam sesal
Untuk kekasih yang tak kan pernah kumiliki 3r1k1m0
”

And it creates a lot of ‘.SCR’ files and also changes Shell Extensions for all Drives(C,D,E,F,G,H..whatever).

So when you try to open any drive,or if you right-click on any drive you’ll be amazed to find “Test,Configure” instead of standard “Open/Explore”.

It also changes the registry to hide all the hidden folders and also disables ‘FOLDER OPTIONS’.

Let’s See How to Remove Surabaya virus

THE SOLUTION:

>>STEP1: Download free ClamWin Anti Virus, install, update then boot into safe mode [Press F8 during start up and select Safe mode Booting], disable any other antivirus software that you have, and perform
a full scan:

Size: 5.5 MB

http://rapidshare.com/files/208762048/clamwin-0.88.5-setup.exe

This is a Free Anti Virus which detects Surabaya. After deleting all the viruses by the antivirus perform the steps below.

Note: You can proceed to next step if you have already deleted the virus with any other anti-virus. It is not that only ClamWin anti virus must be used.

>>STEP2: Delete file ‘Autorun.inf’ which allows the malicious script to run automatically when you click/double click on the drive.

If you are not able to delete it from Windows Explorer,then you can try using ‘DOS Command Prompt’. To enter into this,

Go to Start Menu>Click on RUN>Type ‘cmd’ ,Click ‘OK’.

Now the command prompt will be opened up,

the default root will be ‘C:\Documents and Settings\Administrator>’

You have to change it to ‘C:\’,to do that type ‘cd/’ and it’ll take you to ‘C:\’.

Now type attrib -s -h –r autorun.inf [And Hit ‘Enter’-This is to change attributes if the file so that we can delete it]

Now Type ‘del autorun.inf’

>>STEP3:The Second step is very important because you need to work with ‘Windows Registry’

Ok let’s start it:

Method 1 By Using Command Prompt:

Open a command prompt. Copy and paste the commands given below in your command prompt (To paste in command prompt right click in the black screen and select paste):

reg delete "HKEY_LOCAL_MACHINE\SOFTWARE\Microsoft\Windows NT\CurrentVersion\Winlogon" /v LegalNoticeCaption /f
reg delete "HKEY_LOCAL_MACHINE\SOFTWARE\Microsoft\Windows NT\CurrentVersion\Winlogon" /v LegalNoticeText /f

[Note: If any error shows like: "Registry Editor Has Been Disabled by your Administrator" then You need to enable it. Visit the link Below: http://techrena.blogspot.com/2008/11/how-to-enable-registry-editor-regedit.html ]

Method 2 By Using visual Windows Registry Editor:

As in the first step, go to Start>Click on RUN>type ‘REGEDIT’ and press ‘ok’.

[Note:’REGEDIT’ stands for Windows Registry Edit. If any error shows like: "Registry Editor Has Been Disabled by your Administrator" then You need to enable it. Visit the link Below: http://techrena.blogspot.com/2008/11/how-to-enable-registry-editor-regedit.html ]

How to Remove Surabaya virus

Then Click on>“HKEY_LOCAL_MACHINE”[Click onthe ‘+’ sign]

Then find ‘SOFTWARE’ and Again Click on the ‘+’ sign next to it.

Registry Editor

Next Find ‘Microsoft’ under it and then ‘WINDOWS NT’

Next ‘CURRENT VERSION’ and finally find ‘WINLOGON’.

The path you’ve followed is

HKEY_LOCAL_MACHINE>SOFTWARE>Microsoft>Windows NT>CURRENTVERSION >WINLOGON

on the right windows (under data) modify or delete “LegalNoticeCaption” & “LegalNoticeText”.

Winlogon

This removes any message coming up in the start up.

>>STEP4: Visit the link below and enable your Show Hidden folder Options:

http://techrena.blogspot.com/2008/11/how-to-show-hidden-files-and-folders-in.html

This will enable the ‘FOLDER OPTIONS’ and will show hidden files/folders if checked.

I hope this will clear your problem,if still problem exists or have any trouble while doing this, please post them in comments section below.
Posted by Techie Blogger on Saturday, November 01, 2008
21 comments
Older Posts Home
Subscribe to: Posts (Atom)


  • Techrena Dot Net

Loading...

Enter your email address:

Delivered by FeedBurner

  • Blog Archive

    • ▼  2010 (14)
      • ▼  October (1)
        • WinX HD Video Converter Deluxe With Free License Code
      • ►  August (1)
      • ►  July (1)
      • ►  April (1)
      • ►  March (2)
      • ►  February (3)
      • ►  January (5)
    • ►  2009 (35)
      • ►  November (2)
      • ►  April (3)
      • ►  March (10)
      • ►  February (12)
      • ►  January (8)
    • ►  2008 (20)
      • ►  December (4)
      • ►  November (12)
      • ►  October (4)

    Labels

    • Acer Aspire (1)
    • Adsense (2)
    • apple (1)
    • Bing (1)
    • Blogger Tips (1)
    • Browers (2)
    • Canon (1)
    • Chrome (1)
    • Deep Linking (1)
    • Digital Cameras (1)
    • Downloads (3)
    • Drivers (1)
    • Firefox (1)
    • Gmail (1)
    • GodMode (1)
    • Google (7)
    • Greasemonkey (1)
    • How To (29)
    • HP Laptops (3)
    • Internet (1)
    • iPod (1)
    • Mobile Phones (4)
    • Network (2)
    • Nokia (4)
    • Notebooks (4)
    • oscars 2010 live (1)
    • Password (2)
    • PDA (1)
    • Router (2)
    • Solutions (15)
    • Sony Ericsson (1)
    • System (3)
    • TechNews (6)
    • USB BOOT (3)
    • Virtual XP (1)
    • Virus (1)
    • VistaSolutions (3)
    • watch online (1)
    • Websites (1)
    • Windows (8)
    • Windows7 (9)
    • Yahoo (1)
    • YouTube (2)

Copyright 2009 Techrena dot Net